Updated Banjo/Highbanker Plans.
+3
Rtanweb
fire1aus
staples61
7 posters
Gold Detecting and Prospecting Forum :: General :: Prospecting Answers :: Sluicing, Panning, & History
Page 1 of 2
Page 1 of 2 • 1, 2 
 Updated Banjo/Highbanker Plans.
Updated Banjo/Highbanker Plans.
It has been a few years now since the Banjo plans have been updated. I withhold permission for these plans to be cut and pasted or duplicated onto any other web site. (Without my express permission!)
The old plans that are getting around the net has a few flaws in them in so much as strengthening the top hopper to stop it bellying out over a period of time. And the gold tray which was first displayed on our field trip to Abercrombie river by a chap named Johno {as recorded at the time in the Group Trip & Attendance journal. Then again at Oallen Ford by Johno and Doug for that year 2004 }. As stated the Banjo is a high breed of the Queenslander Wet Jig and can be operated in much the same manner, in other words at a pinch the Banjo can be worked like the old type bush Banjo without a pump hence the name. But the unit has to be of a smaller size. The double tray system used by some makes the Banjo much larger in size than what a single tray system dose and remember if it is heavy on the way in, it will be 3 times heaver on the way out the plan is to keep it simple.
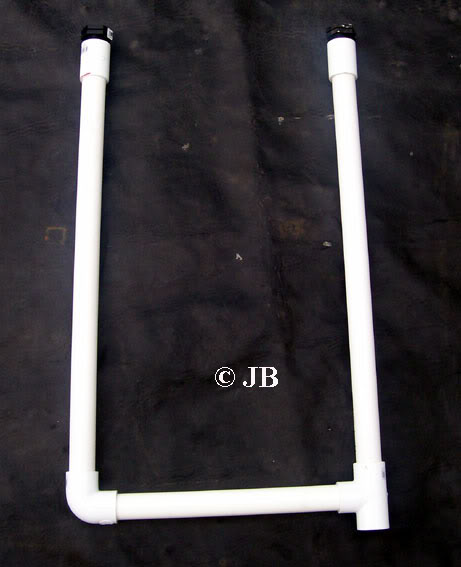
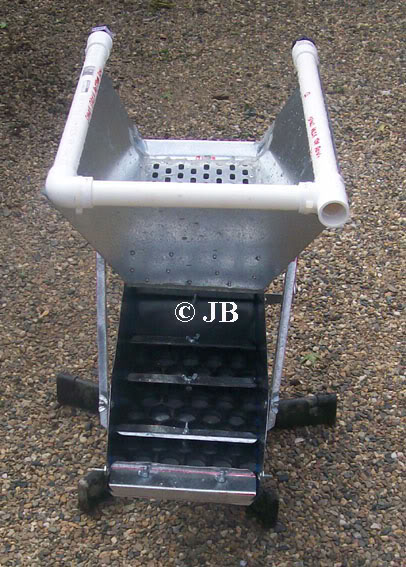
For the Jetting pipes use 20 mm pipe, one 20 mm elbow one 20 mm T joint and two 20 mm end caps. For a one inch pump use 1.5 mm jet holes for a one and a half inch pump use 2 mm jetting holes. Each row of holes should be placed ¼ inch apart at one inch intervals. Drilling the holes should be staggered. The size of the jetting will also govern how much fuel your pump will use. Do not glue the joints you may be required to pull them apart one day.
For legs we have used modified computer chair bases which will give you a 360 degree swivel, which is great when working a patch.
The riffle and mattering of the unit is left up to the person making the unit, as what I deem to work well for me may not suite you at all.
We have long since stopped using Aluminium but use .97mm up to 1.2mm gal which is a much stronger material. Plastic works ok for the weekender or if you just want to scratch sand but it will not go the distance and the weight believe it or not it is heavy by comparison.
Bottom hopper
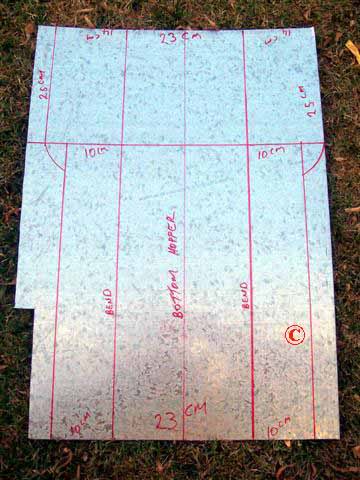
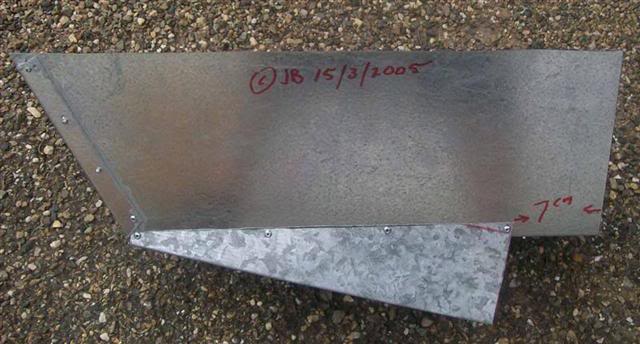
In photo 1 it shows how to mark out your bottom hopper. You can make your unit as big or as small as you wish, this unit is 77 cm long by 23 cm wide. The back walls are 14cm high and 25 cm long. The front walls are 10cm high and 52 cm long.
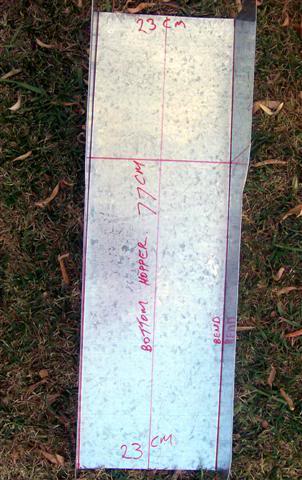
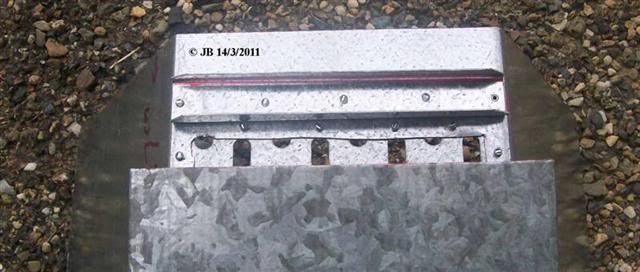
Photo 2 shows the cut out section.
Photo 3 shows how it should look after bending the bottom hopper.
Photo 4 shows the back plate for the bottom hopper. You put the folds to the outside of the bottom hopper and rivet in place. More on the bottom hopper later.
Top Hopper
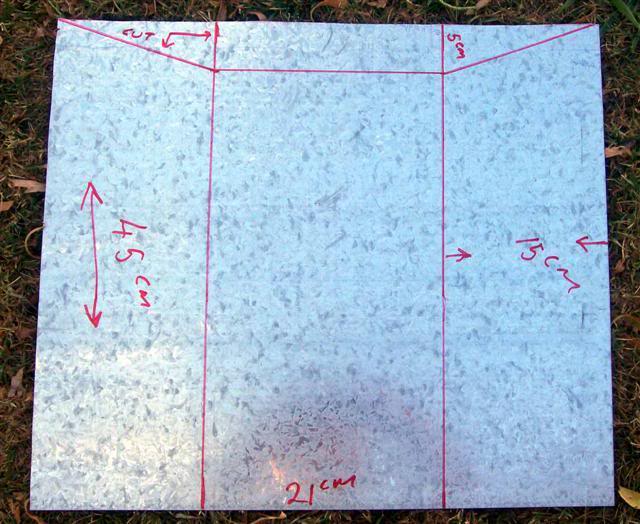
Photo 5 shows how to mark out the top hopper which is 45 cm long, 21 cm wide & the side walls are 15 cm high. On the two centre lines measure down 5 cm and mark out as shown in the photo.
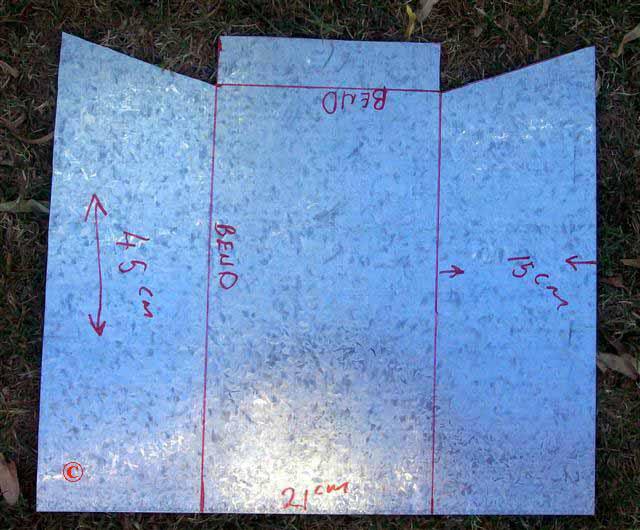
Photo 6 shows how the top hopper should look after been cut out.
Photo 7 shows how to bend the top hopper. The centre plate is bent straight up then bent back when fitting the rear plate. The side walls are bent with an angle wide enough to let your shovel miss the jetting pipes.
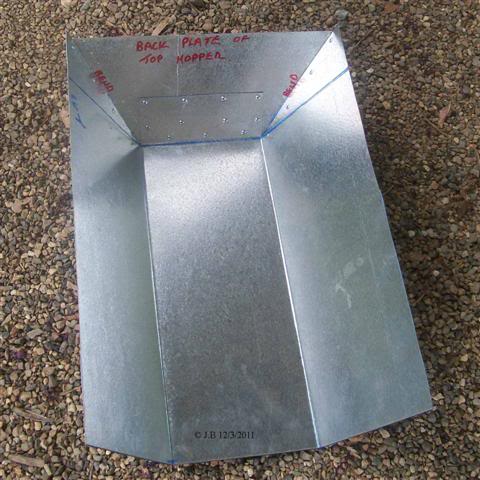
Photo 8 shows how the unit will look when fitted tougher.
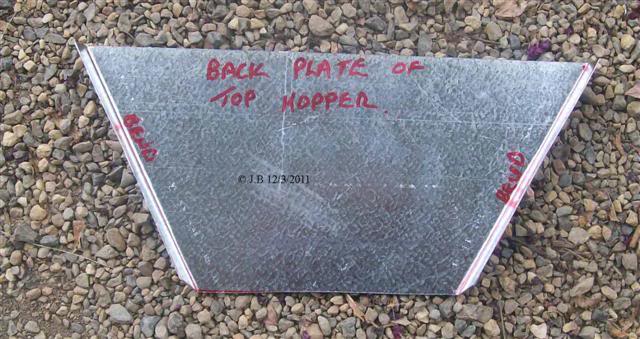
Photo 9 shows how to mark out the back plate to the top hopper.
Photo 10 shows the bend in the back plate.
Photo 11 shows fitting the back plate note the tags should go to the outside on the side walls.
Skid Plate
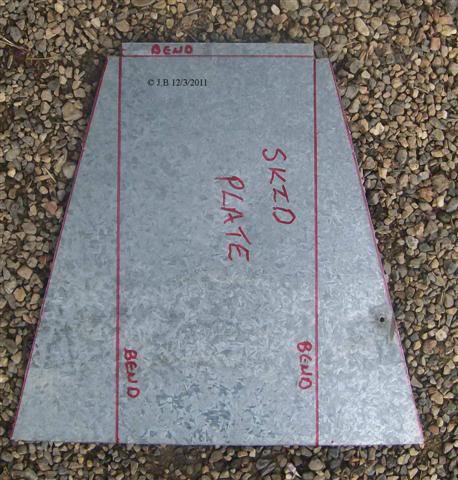
Photo 12 shows how to mark out the skid plate.
Photo 13 shows the cut out of the skid plate.
Photo 14 shows the skid plate bends more on the skid plate later.
Fitting the Classifier Mesh to the top hopper.
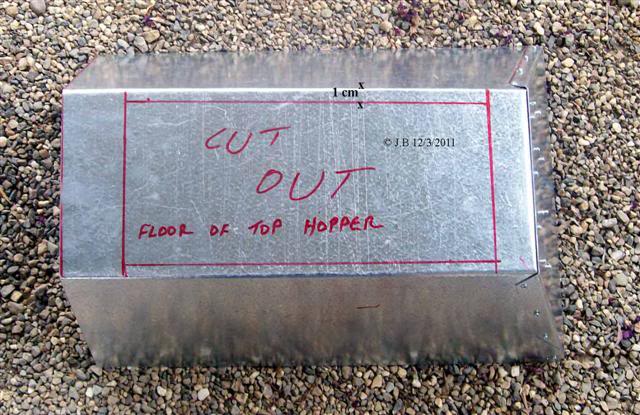
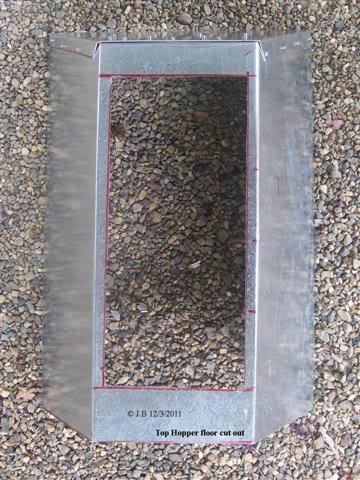
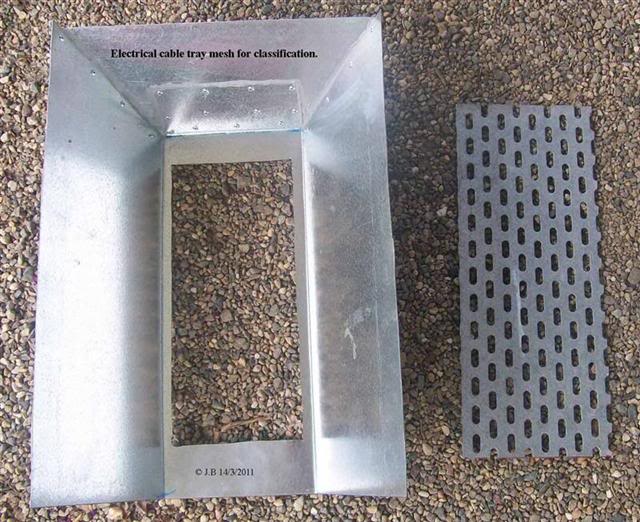
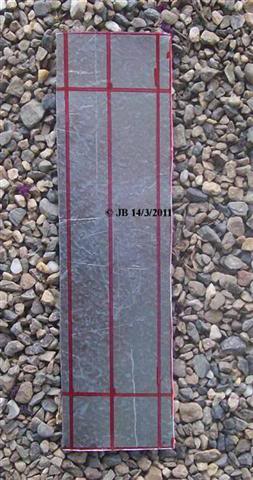
Photo 15 shows the cut out section for fitting the classifier mesh in the top hopper. You need to have a 1 cm cap to rivet the mesh onto, down each side of the top hopper. See photo.
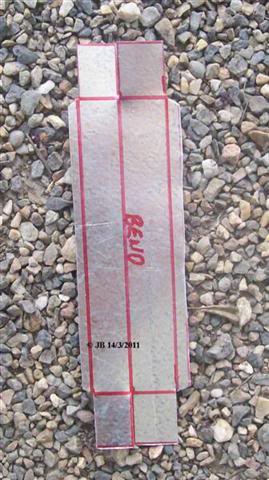
Photo 16 shows the cut out section of the top hopper.
Photo 17 shows the inside view of the top hopper and mesh.
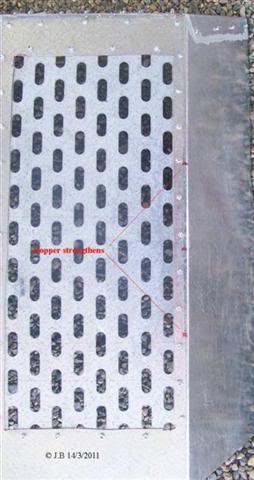
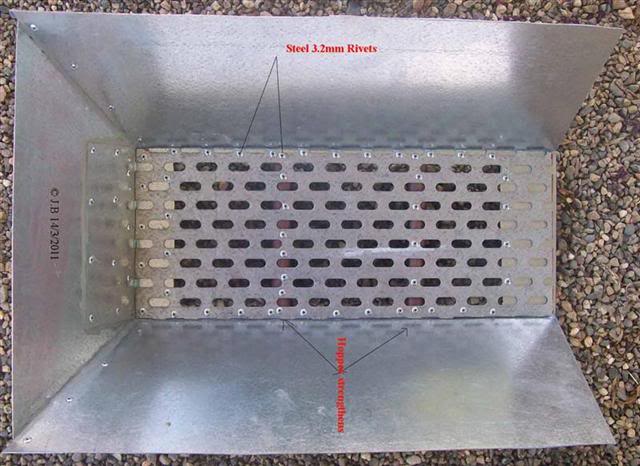
Photo 18 shows the classifier mesh fitted note how it is riveted in place.
Top Hopper Reinforcement.
Photo 19 shows where to fit the reinforcement bars find half way then half that distance again.
Photo 20 shows how the bars should look.
Photo 21 shows how to fix the bars in place.
Placing the skid plate.
Photo 22 shows how to fix the skid plate in place.
More on the top hopper reinforcement.
Photo 23 shows a U shaped plate just in front of the classifier mesh.
Photo 24 shows where to fit the mounting hinges you need to put them on now.
Photo 25 shows how to mark out the top strengtheners and back wash riffle.
Photo 26 shows how to cut that riffle out.
Photo 27 shows how to bend the riffle. You are looking from the top down.
Photo 28 shows how to fit the riffle. Once that is done you must seal all the joints. The top hopper is now completed except for the jetting pipes.
The bottom hopper gold skid plate.
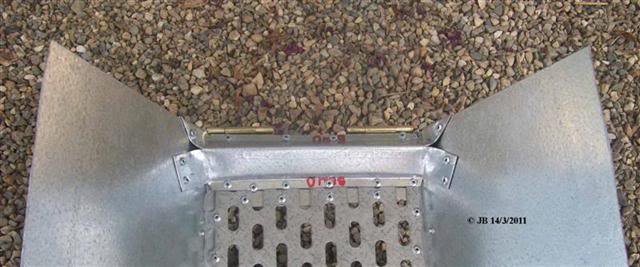
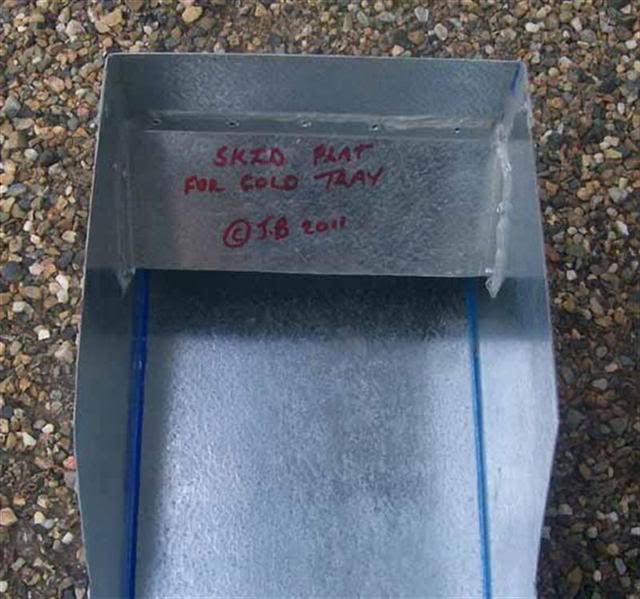
Photo 29 shows how to cut and bend the skid plate for the gold tray. The skid plate must cover at least ½ the gold tray.
Photo 30 shows how to fit the skid plate. It must be at least 2 inches of the floor of the bottom hopper. This space is to allow the gold tray to slide under the plate.
The gold tray.
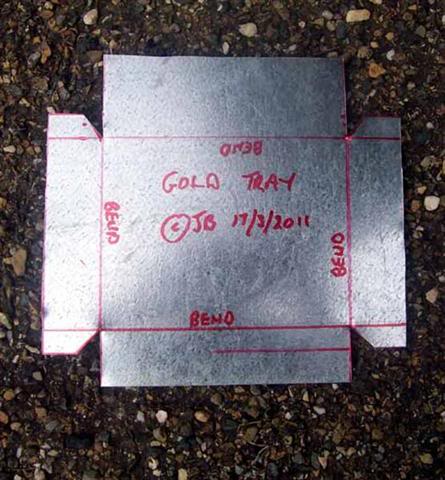
Photo 31 shows how to mark out the gold tray.
Photo 32 shows what it should look like once it has been cut out.
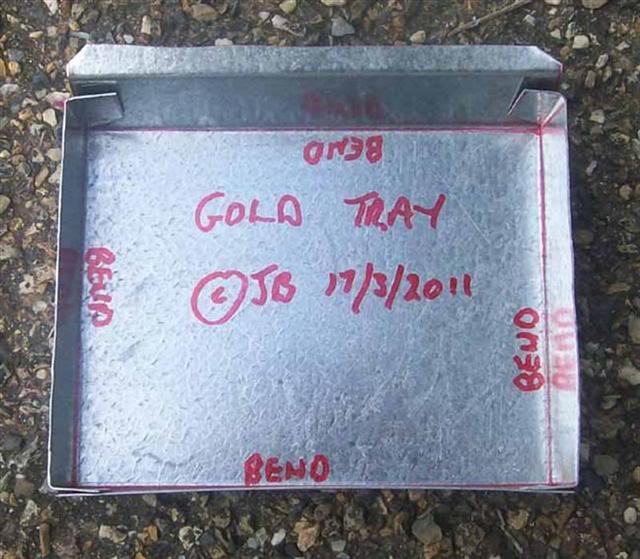
Photo 33 shows how to bend the tray.
Photo 34 shows how the gold tray fits into the Banjo.
Jetting
Photo 35 Consist of two 20mm pipes down each side of the Banjo.
Photo 36 You need to mark two lines ¼ inch apart on each length of pipe. The full length of the pipe you then need to mark 1 inch spacing down the full length of the pipe.
Photo 37 There is no need to mark or drill the back section of the pipe.
You can use a 1.5 mm or a 2mm drill bit depending on pump size.
Start on the top row on your first 1 inch mark and drill on those marks the full length of the pipe but only on the top row. When done start on the bottom row but in the middle of the holes drill in the top row. Do this all the way along the pipe.
On the second jetting pipe start at the bottom of the pipe on the bottom line drilling the full length on the inch marks. When don start on the top row drilling between the holes. This will give a zig zag effect to the jetting spray. Each jet will not hit its opposition.
The Struts for holding up the top hopper
Photo 38 The Struts are around 12 inches long. And drilled in such a maner to allow adjusting of the top hopper up and down.
Photo 39 the completed banjo
Photo 40 the completed banjo
1
2

3
4

5
6
7

8

9

10
11
12

13
14

15
16
17
18

19
20

21
22
23
24

25
26
27

28
29

30
31

32
33
34

35

36

37
38

39

40
I withhold permission for this article to be cut and pasted or duplicated onto any other web site. The reproduction of this account must include the attribution of authorship and the associated copyright notice which follows the account. You may not modify, alter, add to, adapt, edit, abridge, condense or repackage this account without the written permission of the author.
© JB 9/3/2011
It has been a few years now since the Banjo plans have been updated. I withhold permission for these plans to be cut and pasted or duplicated onto any other web site. (Without my express permission!)
The old plans that are getting around the net has a few flaws in them in so much as strengthening the top hopper to stop it bellying out over a period of time. And the gold tray which was first displayed on our field trip to Abercrombie river by a chap named Johno {as recorded at the time in the Group Trip & Attendance journal. Then again at Oallen Ford by Johno and Doug for that year 2004 }. As stated the Banjo is a high breed of the Queenslander Wet Jig and can be operated in much the same manner, in other words at a pinch the Banjo can be worked like the old type bush Banjo without a pump hence the name. But the unit has to be of a smaller size. The double tray system used by some makes the Banjo much larger in size than what a single tray system dose and remember if it is heavy on the way in, it will be 3 times heaver on the way out the plan is to keep it simple.
For the Jetting pipes use 20 mm pipe, one 20 mm elbow one 20 mm T joint and two 20 mm end caps. For a one inch pump use 1.5 mm jet holes for a one and a half inch pump use 2 mm jetting holes. Each row of holes should be placed ¼ inch apart at one inch intervals. Drilling the holes should be staggered. The size of the jetting will also govern how much fuel your pump will use. Do not glue the joints you may be required to pull them apart one day.
For legs we have used modified computer chair bases which will give you a 360 degree swivel, which is great when working a patch.
The riffle and mattering of the unit is left up to the person making the unit, as what I deem to work well for me may not suite you at all.
We have long since stopped using Aluminium but use .97mm up to 1.2mm gal which is a much stronger material. Plastic works ok for the weekender or if you just want to scratch sand but it will not go the distance and the weight believe it or not it is heavy by comparison.
Bottom hopper
In photo 1 it shows how to mark out your bottom hopper. You can make your unit as big or as small as you wish, this unit is 77 cm long by 23 cm wide. The back walls are 14cm high and 25 cm long. The front walls are 10cm high and 52 cm long.
Photo 2 shows the cut out section.
Photo 3 shows how it should look after bending the bottom hopper.
Photo 4 shows the back plate for the bottom hopper. You put the folds to the outside of the bottom hopper and rivet in place. More on the bottom hopper later.
Top Hopper
Photo 5 shows how to mark out the top hopper which is 45 cm long, 21 cm wide & the side walls are 15 cm high. On the two centre lines measure down 5 cm and mark out as shown in the photo.
Photo 6 shows how the top hopper should look after been cut out.
Photo 7 shows how to bend the top hopper. The centre plate is bent straight up then bent back when fitting the rear plate. The side walls are bent with an angle wide enough to let your shovel miss the jetting pipes.
Photo 8 shows how the unit will look when fitted tougher.
Photo 9 shows how to mark out the back plate to the top hopper.
Photo 10 shows the bend in the back plate.
Photo 11 shows fitting the back plate note the tags should go to the outside on the side walls.
Skid Plate
Photo 12 shows how to mark out the skid plate.
Photo 13 shows the cut out of the skid plate.
Photo 14 shows the skid plate bends more on the skid plate later.
Fitting the Classifier Mesh to the top hopper.
Photo 15 shows the cut out section for fitting the classifier mesh in the top hopper. You need to have a 1 cm cap to rivet the mesh onto, down each side of the top hopper. See photo.
Photo 16 shows the cut out section of the top hopper.
Photo 17 shows the inside view of the top hopper and mesh.
Photo 18 shows the classifier mesh fitted note how it is riveted in place.
Top Hopper Reinforcement.
Photo 19 shows where to fit the reinforcement bars find half way then half that distance again.
Photo 20 shows how the bars should look.
Photo 21 shows how to fix the bars in place.
Placing the skid plate.
Photo 22 shows how to fix the skid plate in place.
More on the top hopper reinforcement.
Photo 23 shows a U shaped plate just in front of the classifier mesh.
Photo 24 shows where to fit the mounting hinges you need to put them on now.
Photo 25 shows how to mark out the top strengtheners and back wash riffle.
Photo 26 shows how to cut that riffle out.
Photo 27 shows how to bend the riffle. You are looking from the top down.
Photo 28 shows how to fit the riffle. Once that is done you must seal all the joints. The top hopper is now completed except for the jetting pipes.
The bottom hopper gold skid plate.
Photo 29 shows how to cut and bend the skid plate for the gold tray. The skid plate must cover at least ½ the gold tray.
Photo 30 shows how to fit the skid plate. It must be at least 2 inches of the floor of the bottom hopper. This space is to allow the gold tray to slide under the plate.
The gold tray.
Photo 31 shows how to mark out the gold tray.
Photo 32 shows what it should look like once it has been cut out.
Photo 33 shows how to bend the tray.
Photo 34 shows how the gold tray fits into the Banjo.
Jetting
Photo 35 Consist of two 20mm pipes down each side of the Banjo.
Photo 36 You need to mark two lines ¼ inch apart on each length of pipe. The full length of the pipe you then need to mark 1 inch spacing down the full length of the pipe.
Photo 37 There is no need to mark or drill the back section of the pipe.
You can use a 1.5 mm or a 2mm drill bit depending on pump size.
Start on the top row on your first 1 inch mark and drill on those marks the full length of the pipe but only on the top row. When done start on the bottom row but in the middle of the holes drill in the top row. Do this all the way along the pipe.
On the second jetting pipe start at the bottom of the pipe on the bottom line drilling the full length on the inch marks. When don start on the top row drilling between the holes. This will give a zig zag effect to the jetting spray. Each jet will not hit its opposition.
The Struts for holding up the top hopper
Photo 38 The Struts are around 12 inches long. And drilled in such a maner to allow adjusting of the top hopper up and down.
Photo 39 the completed banjo
Photo 40 the completed banjo
1

2

3

4

5

6

7

8

9

10

11

12

13

14

15

16

17

18

19

20

21

22

23

24

25

26

27

28

29

30

31

32

33

34

35

36

37

38

39

40

I withhold permission for this article to be cut and pasted or duplicated onto any other web site. The reproduction of this account must include the attribution of authorship and the associated copyright notice which follows the account. You may not modify, alter, add to, adapt, edit, abridge, condense or repackage this account without the written permission of the author.
© JB 9/3/2011
Last edited by James 101 on Sat Jul 23, 2011 2:31 pm; edited 2 times in total
Guest- Guest
 Re: Updated Banjo/Highbanker Plans.
If you have any questions pleas ask. These plans can be used without my consent by members of this site. Some of the photos seem to have been cut off a bit but they still show you what needs to be done. James 101 
Guest- Guest
 Re: Updated Banjo/Highbanker Plans.
well done James101 Bob was looking for these a while ago 
Guest- Guest
 Re: Updated Banjo/Highbanker Plans.
Hi James, these plans are great thanks. Is this plan just for the top part?
Thanks,
Uncle Bob.
Thanks,
Uncle Bob.
Guest- Guest
 Re: Updated Banjo/Highbanker Plans.
Bob mate they cover the lot. In my reply to Charlie today I posted what type of matting and the riffle configeration I use. The matting is a floor mat with a smooth bottom which cost around $10 from Home Hardware or Bunnings. And the riffles sit around ½ inch high with a small lip at the top. See photo. Cheers
James 101

James 101

Guest- Guest
 Re: Updated Banjo/Highbanker Plans.
Hi James, that matting that you use it looks like there are holes in them?
UB
UB
Guest- Guest
 Re: Updated Banjo/Highbanker Plans.
They sure do each hole also acts as a riffle, I find this arrangement works very well. But as with any type of wet water plant the secret is in the angle you work them at for the type of gold your working.
cheers
©
cheers
©
Guest- Guest
 Re: Updated Banjo/Highbanker Plans.
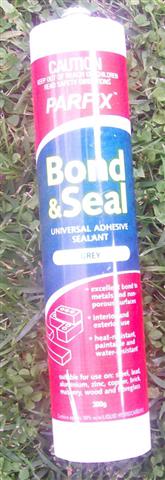
This is the best type of sealant to use. If you cant get this get a sealant that is an adhesive type that sets hard and is pintable. You must seal all your joints it is not advisable to use silicone it’s rubbish by comparison. cheers
©

©
Guest- Guest
 Re: Updated Banjo/Highbanker Plans.
Hi James,
Having a crack at the highbanker , its starting to take shape.
I have two questions.
What sort of pump? I have been looking at a Tsunami 12volt 500gal per hr unit available from U.S.A. for about $50.Would this sort of unit hooked up to a car battery run a unit of the size in your plans ?
Riffles the bent leading edge what angle? Or will a right angle suffice with no lip ?
Thanks for your advice on this.
Michael
staples61- Seasoned Contributor

- Number of posts : 163
Age : 63
Registration date : 2008-11-29
 Re: Updated Banjo/Highbanker Plans.
Michael how you doing? Mate in regards to pumps my advice would be not to go down the road of any 12 vot pumps, believe me you will be disappointed in them in the long run. They just don’t have the grunt for what you need. Look on E bay for a small petrol pump I don’t go much on the Chinese ones but other people think there ok, and they may well be. But quality is best in the long run and that is what you must look at spend only once and once only.
The riffles if you use Hungarian or angle iron riffles they will require a 2 inch cap {3 inches on the centre line} and be tilted at 15 degrees relative to the sluice run. Riffles with narrower spacings tend to fill up and isolate the gold concentrating vortex from the matting.
Flat bar riffles are not recommended because they create excessive turbulence and reduce the vertical segregation of gold particles.
Expanded metal riffles create vortices similar to those in the Hungarian/angle iron riffles but they cut a shorter height of the slurry column into their vortices. Due to its small size and shallow sorting crescent, the expanded metal riffle is very sensitive to changes in slurry density. Expanded metal riffles must be kept tight to the matting to prevent high gold losses caused by excessive scour above the matting.
Cheers James 101

Guest- Guest
 Re: Updated Banjo/Highbanker Plans.
James
Thanks for the advice.
Had a nagging doubt in the back of my mind about the electric pump.
Thanks for the info. on the riffles.
As you can probably figure I dont have much idea when it comes to sluices and highbankers.
My experience is all with "magic wands"
Michael
Thanks for the advice.
Had a nagging doubt in the back of my mind about the electric pump.
Thanks for the info. on the riffles.
As you can probably figure I dont have much idea when it comes to sluices and highbankers.
My experience is all with "magic wands"
Michael
staples61- Seasoned Contributor

- Number of posts : 163
Age : 63
Registration date : 2008-11-29
 Re: Updated Banjo/Highbanker Plans.
Michael mate it is my pleasure indeed. That is what makes this site so great the skill the members have and that they are more than willing to pass on skills, assistance & help to fellow members who need help and assistance. I know bugger all about detecting but if ever I changed my mind I only need ask and my questions and I am more than sure they will be answered.
Cheers mate

Cheers mate
Guest- Guest
 Re: Updated Banjo/Highbanker Plans.
Hi James
Just a question on riffles
i have been thinking about making another sluice/highbanker but using drop riffles instead of the normal ones do you know if they would work any better as you dont need to use any matting?
thanks Mick
Just a question on riffles
i have been thinking about making another sluice/highbanker but using drop riffles instead of the normal ones do you know if they would work any better as you dont need to use any matting?
thanks Mick
fire1aus- New Poster

- Number of posts : 19
Age : 47
Registration date : 2009-08-05
 Re: Updated Banjo/Highbanker Plans.
Mate Drop boxes are good indeed we have used them in the past in our gear. Here is what we have found! The length, width an depth is critical for the drop box to work to its peak performance. A deflection riffle needs to be placed just in front of the drop box which deflects the fine grass roots which find their way into the system the deflection must be set to ¾ of the way over the drop box. When the drop boxes were tested in the Banjos it was found the water velocity, slurry density and the placement of the drop boxes all played an important factor in the fine gold retention. But the main factor which turned me against them was the clean up. Unlike the gold tray where you just pull it out then slip it back in. With a drop box there is a fair bit of fiddling to remove the box then replace it. As for matting we run matting in the bottom of the drop boxes, over all I find a drop box system will run rings around any type of riffle system any day I do like them. But they will drive you nuts at cleanup time. cheers
 JB
JB

 JB
JB
Guest- Guest
 Re: Updated Banjo/Highbanker Plans.
Hi James
Thanks for the reply
do you know the critical measurements for the drop riffles? length, width and depth
i was thinking about making an insert in the bottom of my sluice/highbanker do you think that would work?
then all you have to do is pull insert out and do your clean up
Thanks Mick
Thanks for the reply
do you know the critical measurements for the drop riffles? length, width and depth
i was thinking about making an insert in the bottom of my sluice/highbanker do you think that would work?
then all you have to do is pull insert out and do your clean up
Thanks Mick
fire1aus- New Poster

- Number of posts : 19
Age : 47
Registration date : 2009-08-05
 Re: Updated Banjo/Highbanker Plans.
Mick that will work well. The drop box measurement we found to work well was the width is as wide as your unit, the length was 4 inches long, by one and a half inches deep. Not a speck will get by the drop box, but you must take into consideration the points that have been indicated already. The clean up would be the most important factor to consider remember not all the gold will come down with the wash at cleanup time, there will always be the stragglers. That is gold free of the wash taking it’s time to come down the sluice you don’t want to loss this gold through the drop box opening. Cheers.
James 101
© J.B 13/5/2011

James 101
© J.B 13/5/2011
Guest- Guest
 Re: Updated Banjo/Highbanker Plans.
Awesome project! thanks for the pics.
Now i wish i paid attention in the shop class!
Now i wish i paid attention in the shop class!
Rtanweb- Seasoned Contributor

- Number of posts : 177
Age : 47
Registration date : 2009-10-28
 Re: Updated Banjo/Highbanker Plans.
Rtanweb yep they work well, light and easy to walk into position, as they say stick to the KISS {Keep It Simple Stupid} principle and you cant go wrong. Cheers

Guest- Guest
 Re: Updated Banjo/Highbanker Plans.
Well I have been a little busy making my new Banjo !! I have had a design in my head for a while so after all the floods I thought it was about time I put my thoughts into action!!
For may years myself and a few mates have been working many flood leads in Vic and NSW these were laid down 25 to35 yrs ago when big rains moved the gold to higher plains so the type of Banjos that I had been making were more attuned to prospecting as in the Mini Banjo and then the field Banjo with good results from both types BUT now we have had much sand and gravel movements I reckoned it was time for Production Banjo !!! One that has the size to cope with many hours of shovelling !!
Here is the first pic of the
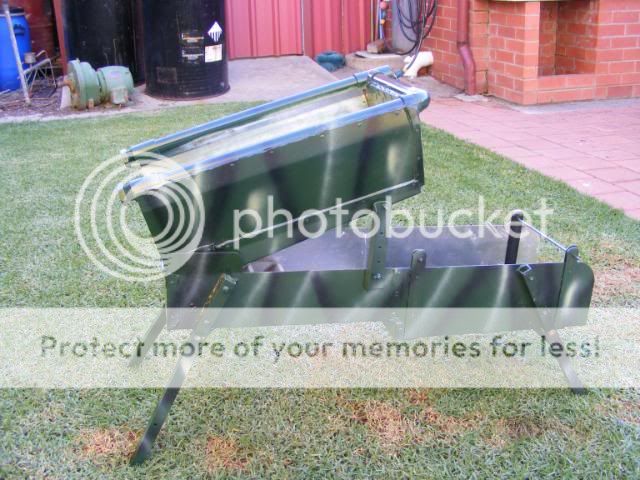
you can see ive put a drop to the riffle section as I wanted to keep the slurry/water at the same level as the slick plate this in my opinion helps to create the best type of vortex at the tip of the Hungarian riffle plus ive kept the catch tray at the top of the banjo this as we know from years of use catches up to 90+% of the gold so Im confident that the other % will be caught in the riffle section. The bottom body of the unit is wayyyyy longer than I normally make it as for the reasons above and for lightness ive returned to Aluminium 1.6mm thick .
I will put up sketches as soon as I get my scanner fixed and more pics when my son returns my camera !!
I withhold permission for this article to be cut and pasted or duplicated onto any other web site. The reproduction of this account must include the attribution of authorship and the associated copyright notice which follows the account. You may not modify, alter, add to, adapt, edit, abridge, condense or repackage this account without the written permission of the author.
 JM 1/6/2011
Now let me explain the above paragraph --It is impossible to have a design copyright or a Patent applied for on any of these machines no matter what some people think !! the simple fact is that ALL these concepts are just variants on a theme !! so all im doing is telling some people ,they know who they are , that these pics are MINE /taken by me and of items I have made myself -- YOU can reproduce these on other forums BUT you will acknowledge me in doing so!! anything less than that would be in my opinion sheer ignorance on your behalf .
Even if you have an item Patented it only covers commercial manufacturing not an item made for your personal use -I believe you are allowed to make one copy for personal use and are safe from breaking the law. I have been involved with this process with a friend of mine in the 90's and the costs were astronomical !! So let me say from my own lips that any one can copy this banjo with my blessing -I would only be to pleased to help people to get through such a project .
For may years myself and a few mates have been working many flood leads in Vic and NSW these were laid down 25 to35 yrs ago when big rains moved the gold to higher plains so the type of Banjos that I had been making were more attuned to prospecting as in the Mini Banjo and then the field Banjo with good results from both types BUT now we have had much sand and gravel movements I reckoned it was time for Production Banjo !!! One that has the size to cope with many hours of shovelling !!
Here is the first pic of the

you can see ive put a drop to the riffle section as I wanted to keep the slurry/water at the same level as the slick plate this in my opinion helps to create the best type of vortex at the tip of the Hungarian riffle plus ive kept the catch tray at the top of the banjo this as we know from years of use catches up to 90+% of the gold so Im confident that the other % will be caught in the riffle section. The bottom body of the unit is wayyyyy longer than I normally make it as for the reasons above and for lightness ive returned to Aluminium 1.6mm thick .
I will put up sketches as soon as I get my scanner fixed and more pics when my son returns my camera !!

I withhold permission for this article to be cut and pasted or duplicated onto any other web site. The reproduction of this account must include the attribution of authorship and the associated copyright notice which follows the account. You may not modify, alter, add to, adapt, edit, abridge, condense or repackage this account without the written permission of the author.
 JM 1/6/2011
Now let me explain the above paragraph --It is impossible to have a design copyright or a Patent applied for on any of these machines no matter what some people think !! the simple fact is that ALL these concepts are just variants on a theme !! so all im doing is telling some people ,they know who they are , that these pics are MINE /taken by me and of items I have made myself -- YOU can reproduce these on other forums BUT you will acknowledge me in doing so!! anything less than that would be in my opinion sheer ignorance on your behalf .
Even if you have an item Patented it only covers commercial manufacturing not an item made for your personal use -I believe you are allowed to make one copy for personal use and are safe from breaking the law. I have been involved with this process with a friend of mine in the 90's and the costs were astronomical !! So let me say from my own lips
Last edited by Murachu on Fri Jun 03, 2011 3:05 pm; edited 1 time in total
Guest- Guest
 Re: Updated Banjo/Highbanker Plans.
Cheers
James 101
Guest- Guest
 Re: Updated Banjo/Highbanker Plans.
more pics
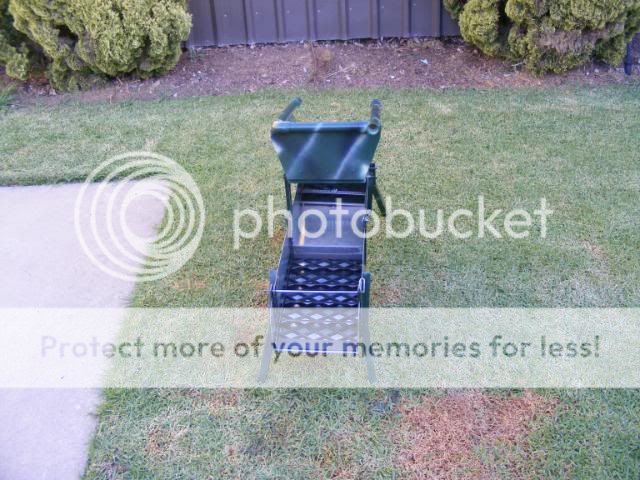
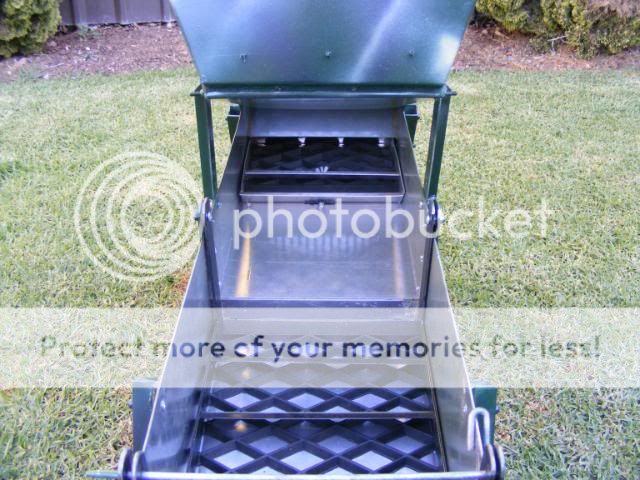
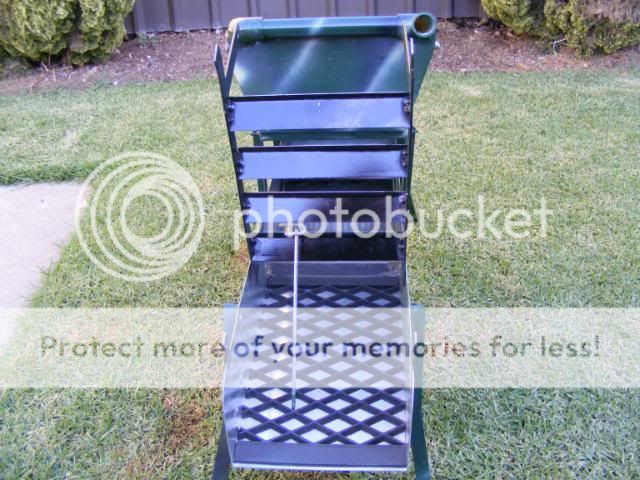
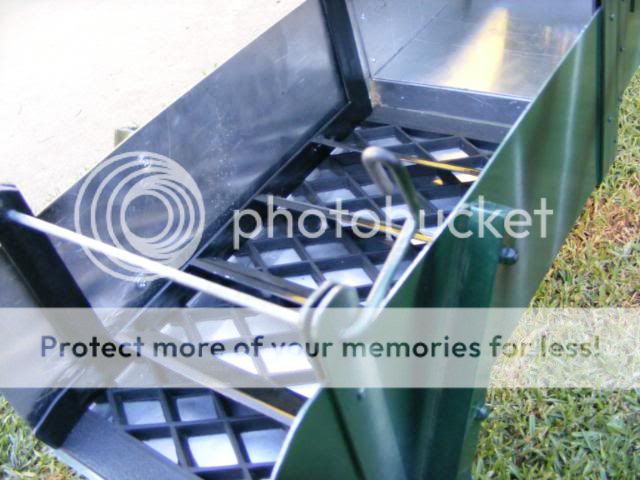
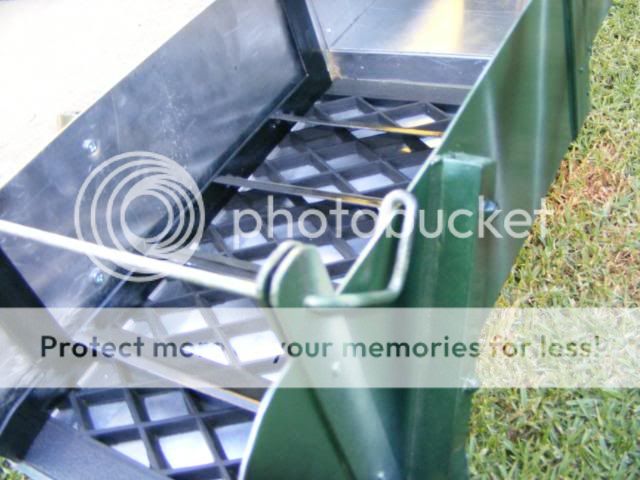
you can see from these pics the riffle section is made like a dredge one and the clip idea is from an old dredge a mate had yrs ago


you can see from these pics the riffle section is made like a dredge one and the clip idea is from an old dredge a mate had yrs ago
Guest- Guest
 Re: Updated Banjo/Highbanker Plans.
James
As a new member I am extremely impressed at the effort you go sharing useful info
Well Done

Rangirocks- Contributor

- Number of posts : 68
Age : 69
Registration date : 2011-05-12
 Re: Updated Banjo/Highbanker Plans.
Rangirocks wrote:
James
As a new member I am extremely impressed at the effort you go sharing useful info
Well Done


Thanks mate, that is the best part about this site if you are a new starter requiring help, the guys on site will go out of there way to help. They do know there stuff indeed. cheers
Guest- Guest
 Re: Updated Banjo/Highbanker Plans.
Here is a few pics of the Production Banjo in manufacture


this type of build requires a bit of patience and know-how but there is nothing inherently difficult in its manufacture but I would advise a beginner to try one of the Banjos that James 101 has put in here before you try this one .The principle things are to get measurements right as well as angles --


this type of build requires a bit of patience and know-how but there is nothing inherently difficult in its manufacture but I would advise a beginner to try one of the Banjos that James 101 has put in here before you try this one .The principle things are to get measurements right as well as angles --
Guest- Guest
 Re: Updated Banjo/Highbanker Plans.
Murachu, Mate top effort, and a great way of thinking. With the old systems chocking for a short instance when working heavy mineralised ground, this system will over come this problem indeed. cheers
Guest- Guest
 Re: Updated Banjo/Highbanker Plans.
Camouflage is a method of – avoidance of observation – that allows an otherwise visible Organism or object to remain indiscernible from the surrounding environment through deception.
Why do you need to know this you may ask? Well the answer is in the paint job on our gear. A lot of people have painted their Banjos in camouflage colours without really knowing why other than the fact they may look good. The reason I do this is not to hide the gear when I am working but so I can stash it when I am not. This is done when we have to trek into areas where it is difficult to get gear in and out each day, so the need to stash comes into play the camouflage helps the gear to blend into the area where it is stashed.
Simple but true.
Cheers
James 101
© 29/6/11
Guest- Guest
 Re: Updated Banjo/Highbanker Plans.
yes James and NOT as some people were told "that its to do illegal stuff with "" LOL! well its not ,just as you say James its for blending the gear into the area when you are not looking forward to the trek out at the end of the day!! 
Guest- Guest
 Re: Updated Banjo/Highbanker Plans.
Blending the gear into the area where ya working is very important at times there are quite a few $$$ at stake. Every caution should be taken to protect what you have as they say if the eye don't see it the heart don't miss it. grin cheers.
James 101

James 101
Guest- Guest
 Re: Updated Banjo/Highbanker Plans.
James 101 wrote:Camouflage is a method of – avoidance of observation – that allows an otherwise visible Organism or object to remain indiscernible from the surrounding environment through deception.
Why do you need to know this you may ask? Well the answer is in the paint job on our gear. A lot of people have painted their Banjos in camouflage colours without really knowing why other than the fact they may look good. The reason I do this is not to hide the gear when I am working but so I can stash it when I am not. This is done when we have to trek into areas where it is difficult to get gear in and out each day, so the need to stash comes into play the camouflage helps the gear to blend into the area where it is stashed.
Simple but true.
Cheers
James 101
© 29/6/11
Totally agree!
I also take the added measure of using a strong bike lock to secure my gear to the nearest tree + adding natural foliage.
My Camo job.
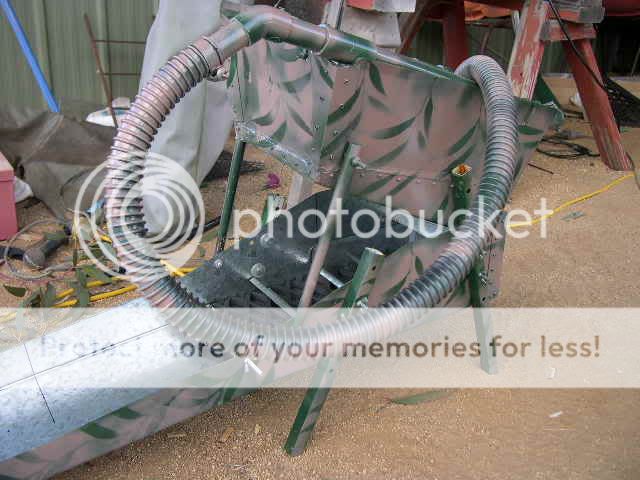
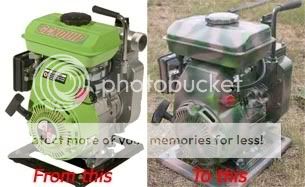

Robbo- New Poster

- Number of posts : 18
Registration date : 2011-07-27
 Re: Updated Banjo/Highbanker Plans.
so no leaves were harmed in the painting of your banjo then!! 
and its NOT a 2 stroke !!
and its NOT a 2 stroke !!
Guest- Guest
Page 1 of 2 • 1, 2 
 Similar topics
» banjo highbanker
» Murachu’s Banjo/highbanker
» alluvialgprospectors sluice/highbanker plans. Need help.
» The Banjo How It Works.
» To Building a Simple Banjo
» Murachu’s Banjo/highbanker
» alluvialgprospectors sluice/highbanker plans. Need help.
» The Banjo How It Works.
» To Building a Simple Banjo
Gold Detecting and Prospecting Forum :: General :: Prospecting Answers :: Sluicing, Panning, & History
Page 1 of 2
Permissions in this forum:
You cannot reply to topics in this forum